How to secure the powerGateServer connection with a certificate
Create Certificate
A self signed certificate can be generated using the Internet Information Service(IIS). This step can be skipped if you already have a certificate.
- Click on the Start menu and open the Internet Information Services (IIS) Manager
- Click on the name of the server in the "Connections" panel on the left
- Double click on "Server Certificates"
- On the right side, click on "Create Self-Signed Certificate"
- Enter a name and click "OK"
Add the certificate to the trusted root store
The self signed certificate can be added to the trusted root store in order to avoid errors with the certificate:
- Open the Microsoft Management Console (MMC)
- Click on "File" -> "Add/Remove Snap-in..."
- Search for "Certificates" and click "Add >"
- Choose the account and click "Finish"
- Click "OK"
- Click on "Certificates"
- Right click on a folder and go to "All Tasks" -> "Import"
- Select your certificate
powerGateServer configuration
Navigate to the plugin folder C:\ProgramData\coolOrange\powerGateServer\Plugins and open your "{NameOfYourPlugin}.addin" file, which must be extended, so that all the implemented Webservices are accessible through the HTTPS protocol:
{
  "Assembly": ".\NameOfYourPlugin.dll",
  "Protocol":"https",
}
Change the security setting in line 9 in the file powerGateServer.exe.config under C:\Program Files\coolOrange\powerGateServer:
<security mode="Transport" />
Note: All the installed plugins must now be changed to use https instead http bindings!
IIS configuration
Solution 1: IIS Manager
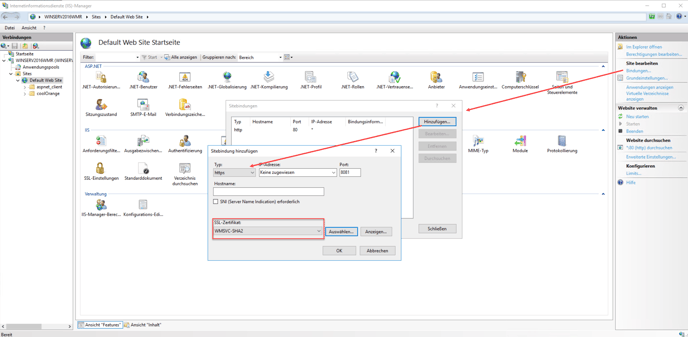
In order to enable the HTTPS within IIS, open the Internet Information Services (IIS) Manager and navigate to Sites -> Default Web Site. Click on Bindings... and create a new https binding for the previously configured port.
 The previously created SSL-certificate must now be selected.
Solution 2: Command line
Bind the certificate to an URL or a port using the Command Line
The certificate needs to be bound to an url or a port using netsh.
In order to create a binding ip and port or URL, certification hash and application id need to be defined.
IP and port(ipport):
Syntax <IP>:<Port>
<IP> can be set to 0.0.0.0 to match all IPv4 and IPv6 addresses
<Port> can be chosen freely, but mustn't be reserved or used by another application
URL(urlacl):
If using the urlacl it is important to also specify the certstorename parameter, otherwise cryptic errors are thrown
certification hash(certhash):
This can be copied from the certification file properties in IIS
Application id(appid): choose an appid in order to identify this binding later. This should be in the format {00112233-4455-6677-8899- AABBCCDDEEFF}
Syntax:
netsh http add sslcert ipport=<ipport> certhash=<certhash> appid=<appid>
Example (! Do not copy. This is just an example how to call netsh!):
netsh http add sslcert ipport=0.0.0.0:8081 certhash=0102030405060708090A0B0C0D0E0F1011121314 appid={00112233-4455-6677-8899- AABBCCDDEEFF}
Optionally you can configure namespace reservations for the previously configured protocol and port, run the following command prompt with elevated privileges:
netsh http add urlacl url=https://+:8081/PGS user=\Everyone

::on german environments this command fails with: Die SDDL konnte nicht erstellt werden. Fehler: 1332
::use the following command instead:
::netsh http add urlacl url=https://+:8081/PGS user=\Jeder
powerGate Client workstations
TLS 1.0, TLS 1.1 and TLS 1.2 must be enabled on all workstations which connect to the powerGateServer through HTTPS bindings.
Depending on the used .Net Framework version of the hosting applications (or possibly when using Internet Explorer) these TLS layers must be enabled manually (see KB article: How to use powerGate with TLS 1.2).
Install the self signed certificate on all workstations so that workstations don't get the error message "There is a problem with this website's security certificate".
See also
ServicePointManager.Security Protocol Property (Microsoft docs)
TLS best practices (Microsoft docs)
How to enable TLS 1.2 (Microsoft docs)
Security of webHttpBinding (Microsoft docs)
